Deploy to GitHub Pages
content was generated utilizing ChatGPT-4.
Now that we've created our blog, let's deploy it to GitHub Pages.
Create a repository
After logging in to GitHub, navigate to the New repository page.
<username> is the username of your GitHub account.
Please be sure to correct it.
Enter <username>.github.io for the repository name, and press the Create repository button to create the repository.
Setting up the repository
Go to the Settings tab of the created repository.
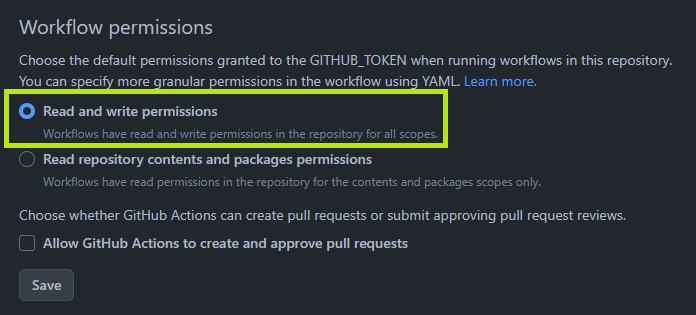
Go to Code and automation > Actions > General > Workflow permissions. Change Workflow permissions to Read and write permissions.

Press the Save button to save the settings.
Committing your work
Push your project.
<your-github-username> is the username of your GitHub account.
git init
git add .
git commit -m "Initial commit"
git branch -M main
git remote add origin https://github.com/<your-github-username>/<your-github-username>.github.io.git
git push -u origin main
You can now see your project in the main branch.
Setting up GitHub Actions
Set up your project to deploy automatically using GitHub Actions. Every time you push to the main branch, it will be deployed to GitHub Pages.
To do this, create a .github/workflows/ folder in your root directory and write a deploy.yml file.
name: Deploy to GitHub Pages

on:
  Push:
    branches:
      - main
    # Review gh actions docs if you want to further define triggers, paths, etc
    # https://docs.github.com/en/actions/using-workflows/workflow-syntax-for-github-actions#on

jobs:
  deploy:
    name: Deploy to GitHub Pages
    runs-on: ubuntu-latest
    steps:
      - uses: actions/checkout@v3
      - uses: actions/setup-node@v3
        with:
          node-version: 18
          cache: yarn

      - name: Install dependencies
        run: yarn install --frozen-lockfile
      - name: Build website
        run: yarn build

      # Popular action to deploy to GitHub Pages:
      # Docs: https://github.com/peaceiris/actions-gh-pages#%EF%B8%8F-docusaurus
      - name: Deploy to GitHub Pages
        uses: peaceiris/actions-gh-pages@v3
        with:
          github_token: ${{ secrets.GITHUB_TOKEN }}
          # Build output to publish to the `gh-pages` branch:
          publish_dir: ./build
          # The following lines assign commit authorship to the official
          # GH-Actions bot for deploys to `gh-pages` branch:
          # https://github.com/actions/checkout/issues/13#issuecomment-724415212
          # The GH actions bot is used by default if you didn't specify the two fields.
          # You can swap them out with your own user credentials.
          user_name: github-actions[bot]
          user_email: 41898282+github-actions[bot]@users.noreply.github.com
Deploy to GitHub Pages
You can now use GitHub Actions to deploy to GitHub Pages.
git add .
git commit -m "Add GitHub Actions configuration"
git push
Once you've done all of this, your blog will be accessible at https://<your-github-username>.github.io. To write a new blog post, simply add a new Markdown file to your my-blog/blog folder and push the changes to your repository.
You have now successfully created a GitHub.io blog using Docusaurus! Start writing new posts, grow your blog, and share it!